Your shopping cart is empty!
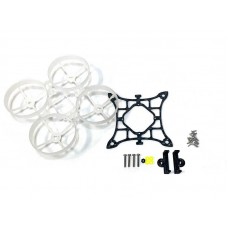
Rotorgeeks Litejay Frame Kit
Price: CAD$29.99
Qty:
- OR -
Add to Wish List
Add to Compare
Add to Compare
Designed to be an indoor/outdoor whoop running an AIO whoop board, 08XX/11XX motors, 40mm props with ducts and powered by a 2S battery (our recommendation). The frame is 1.5mm thick with small tabs to conveniently install an elastic band as a battery holder. The 82mm motor-to-motor distance gives enough clearance between the props/ducts and the FC to reduce damage from bad crashes. You can build it as an Analog or a Walksnail HD machine.
Specifications:
- Weight: 3g (frame only)
- Frame thickness: 1.5mm
- Fits 2" props max without ducts / 40mm props with ducts (82mm motor to motor)
- 3 hole version for Happymodel/standard whoop 08xx/11xx 6.6mm 3 hole mounts
- Fits Whoop sized board
Recommended parts (not included):
- AIO: HappyModel X12 (VTX integrated)
- Camera:
- Analog: Runcam Nano 3
- HD: Walksnail AVATAR HD Mini 1S Kit
- Canopy: TPU Camera Mount for Nano Camera
- Motors: EX0802 19000kv
- Props: 40mm 3bladed props
- Battery: 2S 450mAh
- Pigtail connector: XT30
If you use the recommended parts, you will have a 30g Analog drone / 40g Walksnail HD drone (excluding battery)
If you're looking for an outdoor machine only similar to the Litejay, check out our Bluejay.
Assembly instructions:
- Analog:
- Solder pigtail onto the flight controller
- Install the camera into the canopy
- Plug the camera into the flight controller
- Insert the M2 screws into the bottom of the frame and add M2x2mm TPU spacers on the top
- Install the FC using the provided grommets
- Install the motors and ducts onto the frame using the M1.4x5mm screws (do not use the screws provided inside the HappyModel box as they're too short)
- Plug the motors into the FC
- Install the camera mount onto the frame and secure the VTX antenna onto the TPU camera mount
- Install the M2 plastic nut. The grommets should just start to compress - don't overtighten.
- The build is now complete; you can proceed to set up the FC using Betaflight configurator.
- Walksnail HD:
- Solder pigtail onto the flight controller
- Solder the Walksnail 1S VTX to the board
- Install the camera into the canopy
- Insert the M2 screws into the bottom of the frame and add M2x2mm TPU spacers on the top
- Install the FC using the provided grommets
- Install the M2x4mm TPU spacers on top of the flight controller
- Install the VTX on top of the FC
- Optional: Depending on your canopy choice you may have to install additional M2x2mm spacers (included) on top of the VTX before securing the canopy due to component placement on the VTX board.
- Install the motors and ducts onto the frame using the M1.4x5mm screws (do not use the screws provided inside the HappyModel box as they're too short)
- Plug the motors into the FC
- Install the camera mount onto the frame and secure the VTX antenna onto the TPU camera mount
- Install the M2 plastic locknut. The grommets should just start to compress - don't overtighten.
- The build is now complete; you can proceed to set up the FC using Betaflight configurator.
Dont forget to turn off the X12 integrated VTX
Package:
- 1x Rotorgeeks Litejay frame
- 1x HappyModel Frame
- 2x 3D printed battery holder/washer
- 1x Hardware kit (HD / Analog - your choice)
Write a review
Please Login To Review This ProductRelated


